Add Row
Add Element
UPDATE
Add Element

Your guide to modern living—every day.

  • Home
  • Categories
    • Wellness
    • Home and Garden
    • Work and Life
    • Travel
    • People and Style
    • Living Spaces
January 17.2026
1 Minute Read

Unlock the Magic of the invisible luxury: the technical side of underfloor heating

Imagine saving up to 25% on your energy bills simply by switching to a smarter heating system you can’t even see. If you think radiators are the height of home comfort, it’s time you discovered an invisible luxury revolutionising the way UK homes stay warm. Underfloor heating isn’t just about cozy slippers in winter—it’s a high-tech solution engineered for efficiency, comfort, and seamless design. This guide reveals the technical brilliance behind modern underfloor heating, how Plumbrite delivers expert installation, and why choosing the right system means more comfort for less—year after year.

Surprising Facts: The Science Behind the Invisible Luxury of Underfloor Heating

"Did you know that professionally calibrated underfloor heating can be up to 25% more efficient than conventional radiators in UK homes?" – Plumbrite Technical Team

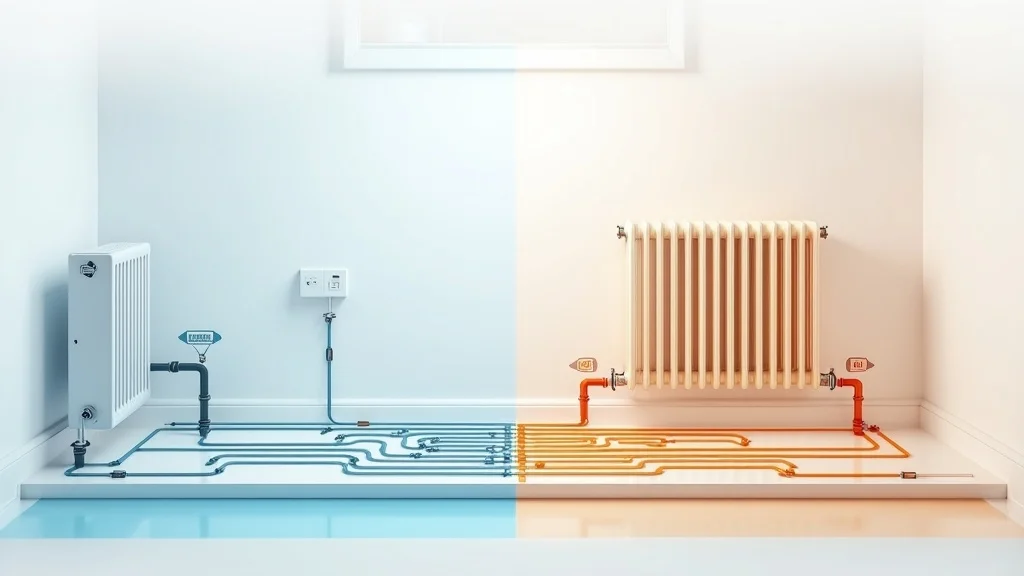
Underfloor heating is more than just a luxury—it’s a leap forward in both science and lifestyle. The invisible luxury: the technical side of underfloor heating is based on how radiant heat works. Unlike traditional radiators that heat the air (which rises and leaves cold spots near the floor), underfloor systems distribute warmth evenly across the entire room from the ground up. This innovation means less wasted energy, lower running costs, and a home that feels warmer at lower thermostat settings.

Plumbrite’s technical mastery comes from understanding not just how to install these systems, but how to fine-tune them for specific UK homes and their unique requirements. By using accurate heat loss calculations, selecting the right floor covering, and calibrating the manifold with absolute precision, Plumbrite ensures that every surface stays cozy with minimal energy. When you switch to underfloor heating, you’re not just adding comfort—you’re making your home smarter, greener, and future-ready.

Inviting modern living room with sleek wooden floors and underfloor heating indication – Showing family enjoying the invisible luxury and comfort of floor heating in a UK home

What You'll Learn About the Invisible Luxury: The Technical Side of Underfloor Heating

  • The core science and engineering behind floor heating systems
  • Key differences between electric underfloor and water-based systems
  • Expert tips for maximizing efficiency in underfloor heating
  • How Plumbrite ensures high-performance in every underfloor heating installation

Understanding the Invisible Luxury: The Technical Side of Underfloor Heating

Floor Heating vs. Traditional Heating: Technical Differences Explored

The result? Cold feet, uneven temperatures, and energy that escapes before you ever feel it

In contrast, underfloor heating uses either electric cables or water pipes beneath your floor covering, providing radiant heat that is evenly distributed. This means each corner of the room receives the same comfortable warmth—no more hot or cold patches. The system works silently, removes the clutter of wall-mounted radiators, and is especially effective with heat pumps, making it a perfect partner for UK homes focused on sustainability. Plumbrite’s expertise ensures your underfloor system is matched to your home’s unique requirements, with precise calibration to guarantee top-tier efficiency and comfort in every room.

Technical diagram comparing underfloor heating vs. radiator system – Showing visible pipes and radiators in a cutaway floor and wall in a UK home

Underfloor Heating System Options for UK Homes

There isn’t a one-size-fits-all solution when it comes to underfloor heating in UK homes. Depending on your project, lifestyle, and property layout, Plumbrite can help you choose the ideal system. Options include electric underfloor heating and hydronic or water-based systems, each with its unique technical advantages. Electric systems are particularly well suited for retrofits or smaller spaces, owing to their slim profile and fast installation. Water-based systems are typically more suitable for new builds or comprehensive renovations where you can accommodate more intricate pipework beneath the floors.

No matter which type you choose, professional installation by fully qualified electricians and plumbers ensures the highest efficiency and long-term reliability. Complex UK regulations and planning officers often require expert oversight, and Plumbrite’s technical teams leverage decades of experience to navigate these standards and deliver tailor-made solutions every time.

Electric Underfloor Heating: Features and Suitability

Electric underfloor heating systems, often called “dry systems,” use electrically heated mats or cables installed beneath most modern floor coverings, including luxury vinyl, engineered wood, and tiles. They warm up rapidly, making them ideal for bathrooms, kitchens, and quick retrofits in older UK homes. These systems require minimal changes to floor height and offer straightforward installation with lower upfront complexity.

For tech-savvy homeowners who prioritise fast heat-up times and simple controls, electric underfloor is a dream come true. Even better, integration with smart thermostats and zoning means that you heat only the rooms you’re actually using, keeping energy bills low and reducing waste. Plumbrite’s electricians are expertly trained and fully qualified, so you can enjoy the invisible luxury with total peace of mind.

Hydronic (Water-Based) Floor Heating for New Builds and Renovations

Hydronic or “wet” systems circulate warm water through a series of high-quality, flexible pipes embedded beneath the floor. This method is particularly efficient when combined with heat pumps or high-efficiency boilers, delivering a gentle, sustained warmth that is perfect for large open spaces, new build homes, or major refurbishments. While installation is more complex and often requires more significant architectural planning, the payoff is long-term energy savings and reliable comfort in even the coldest UK winters.

Because hydronic systems rely on precise manifold calibration and careful heat loss calculations, professional installation is crucial. Plumbrite is the go-to choice for homeowners who demand the very best in heating system technology and technical accuracy. From initial technical surveys to ongoing maintenance, you’re supported by the region’s leading heating experts.

How Underfloor Heating Works: The Technical Side of the Invisible Luxury

Core Components of an Underfloor Heating System

A typical underfloor heating system consists of several carefully engineered components, working seamlessly for optimal comfort:

  • Heating Element: Electric cables, mats, or water-filled pipes provide the primary source of heat beneath the surface.
  • Insulation Boards: Prevent heat from escaping downwards, ensuring maximum upward transfer toward the living areas.
  • Manifold & Controls: For water-based systems, a central manifold distributes heat and manages flow rate with pinpoint accuracy.
  • Thermostats & Sensors: Smart thermostats monitor room and floor temperatures, adjusting performance in real time.
  • Compatible Floor Coverings: Engineered wood, tiles, and luxury vinyl are among the most popular choices for efficient performance.
invisible luxury

Heat Loss Calculations and Their Role in Efficiency

Heat loss calculations are at the heart of a successful underfloor heating project. Before any installation begins, Plumbrite’s technical team analyses your UK home’s insulation, glazing, and floor coverings to determine exactly how much heat is needed to maintain the perfect indoor climate. Rooms with more windows, exposed walls, or less insulation lose heat faster—and these differences can dramatically affect the size and design of your heating system.

By accounting for all variables—including the choice between 150W and 200W systems, type of floor construction, and overall property size—Plumbrite ensures your system is neither underpowered nor wasteful. A precise approach means you won’t pay extra for running costs or experience cold spots once the installation is complete. This technical expertise is what sets Plumbrite apart as the premier underfloor heating expert in the UK.

Engineer testing underfloor heating system with a thermal camera – Focusing on calibrated technical performance on a UK home heated floor

Manifold Calibration: Professional Precision by Plumbrite

The technical key to comfort and efficiency in hydronic underfloor heating systems is the precise calibration of the manifold. This central hub ensures even water flow throughout all loops beneath your floor. If poorly adjusted, one room can be too warm while others are left cold, or energy may be wasted heating empty spaces. Plumbrite’s installation teams use advanced digital tools and strict industry protocols to balance each zone, guaranteeing the invisible luxury operates as intended.

This isn’t just about getting the basic installation right—it’s about an ongoing commitment to quality, with annual checks, responsive support, and detailed handover to homeowners. Precision manifold calibration is what distinguishes a comfortable, cost-effective system from daily headaches. When it comes to enjoying long-term savings, there’s no substitute for professional expertise.

"Precision in manifold calibration is the difference between comfortable, efficient warmth and daily frustration." – Senior Plumbrite Engineer

Comparing Electric Underfloor Heating and Water-Based Systems

Specification Electric Underfloor Heating Water-Based Underfloor Heating
Performance Instant heat-up time Slow but steady and uniform heat
Installation Ideal for retrofits Best for new builds
Running Costs Higher Lower
Maintenance Minimal Occasional checks

Key Benefits of the Invisible Luxury: The Technical Side of Underfloor Heating

  • Even heat distribution in every corner of the space
  • Energy efficiency and cost savings for UK homes
  • Space saving and aesthetic benefits from an invisible system

Bright open-plan kitchen and dining area in UK home – Family experiencing comfort of invisible underfloor heating – No visible radiators

Potential Drawbacks and Challenges of Underfloor Heating Systems

  • Initial installation cost
  • Technical precision required for heat loss management
  • Compatibility considerations for floor finishes (e.g., luxury vinyl)

Technical Insights: Choosing the Right Underfloor Heating System for UK Homes

Evaluating Floor Coverings: Is Luxury Vinyl Good for Underfloor Heating?

When selecting a floor covering for your underfloor heating system, luxury vinyl is a top contender—but only if you follow the correct technical advice. Modern luxury vinyl tiles (LVT) are thin, responsive, and allow efficient heat transfer, making them extremely popular in UK homes. However, it is crucial to ensure the chosen product is specifically rated for use with underfloor heating, and that installation follows the manufacturer’s surface temperature limits. Plumbrite’s specialists are always ready to provide expert advice and perform compatibility checks, ensuring long-term comfort, efficiency, and the protection of your flooring investment.

In addition to performance benefits, luxury vinyl complements the aesthetic advantages of invisible heating systems by providing a versatile palette and easy-clean surfaces. For families with children or pets, this can make a real difference—warm floors, easy maintenance, and no bulky radiators.

Close-up view of luxury vinyl floor compatible with underfloor heating pipes in a UK living room

Power Settings: Which is Better, 150W or 200W for Underfloor Heating?

The technical choice between a 150W and 200W electric underfloor heating system comes down to your property’s insulation and heat loss characteristics. For highly insulated new builds or rooms with minimal heat loss (like bedrooms), a 150W system delivers ample warmth with economical running costs. In rooms with large windows, less insulation, or spaces requiring higher temperatures—such as conservatories or bathrooms—a 200W system offers faster warm-up and more robust output.

Plumbrite’s engineers use detailed heat loss calculations during their survey, recommending the system that ensures top comfort without unnecessary energy use. Remember, more isn’t always better—you need the right wattage for your unique environment, and Plumbrite’s heating experts are available daily to guide you.

Underfloor Heating and Home Resale Value in the UK

Adding a professionally installed underfloor heating system can significantly boost your UK property value when it’s time to sell. Prospective buyers are increasingly seeking efficient, future-ready homes that offer low running costs and advanced features. As a premium, invisible comfort upgrade, underfloor heating can differentiate your property on the market and command a higher sale price—especially when documented by a reputable installer like Plumbrite.

With UK energy standards evolving and eco-conscious living driving market trends, investing in underfloor heating is less about chasing trends and more about adding lasting value and comfort to your home. Plumbrite’s team is available for advice on underfloor heating tailored to your home improvement goals.

Join our Plumbrite professionals behind the scenes as we prepare, lay, connect, and test both electric and hydronic underfloor heating systems in real UK homes. See what technical excellence looks like first-hand!

People Also Ask: Common Questions About the Invisible Luxury of Underfloor Heating

Is luxury vinyl good for underfloor heating?

Luxury vinyl can be compatible with underfloor heating systems, provided the product specifications allow for direct application over heating elements and surface temperatures remain within manufacturer guidelines. Always consult with technical specialists like Plumbrite.

What is the downside of underfloor heating?

Downsides of underfloor heating may include higher initial costs, installation time, and the need for accurate heat loss and system calibration to ensure proper efficiency.

What are common problems with underfloor heating?

Common problems involve insufficient heat due to incorrect installation or calibration, floor damage during retrofits, and lack of professional maintenance.

Which is better, 150W or 200W for underfloor heating?

The choice depends on required heat output: 150W is ideal for well-insulated spaces, while 200W is often better for less insulated or high-heat-loss areas, always calculated as part of Plumbrite’s technical survey.

Watch a live demonstration of a Plumbrite engineer calibrating a water-based underfloor heating manifold for perfect warmth and efficiency.

Expert Reviews and Testimonials for Plumbrite's Invisible Luxury: The Technical Side of Underfloor Heating

"After Plumbrite installed my underfloor heating, my winter bills dropped noticeably and every room feels comfortable – truly an invisible luxury." – Satisfied UK Homeowner

Happy UK homeowner relaxing in modern living room with visible underfloor heating control on wall – Testimonial for Plumbrite’s expert installation

FAQs on the Invisible Luxury: The Technical Side of Underfloor Heating

  • How long does underfloor heating installation take?
    Installation time can vary based on your project size and heating system type. For a typical single room with electric underfloor heating, installation might take one to two days, while a whole-home hydronic (water-based) system in a new build may span several weeks, particularly if floor screeds or complex controls are involved.
  • Is underfloor heating safe for pets and children?
    Absolutely. Systems are designed to run at safe surface temperatures, providing gentle, consistent warmth. There are no hot surfaces or exposed pipes, making floors safe and comfortable for everyone in the family.
  • What maintenance does underfloor heating require?
    Electric systems typically require minimal maintenance beyond checking thermostats and controls. Hydronic systems benefit from occasional manifold inspections, pressure checks, and annual service by qualified professionals to sustain optimal performance.
  • Can underfloor heating be added to existing homes?
    Yes! Electric underfloor heating is ideal for retrofits because it requires minimal depth addition. Water-based systems can also be retrofitted, but may need more substantial floor adjustments. An expert survey from Plumbrite can advise the right solution for your home.

Invisible Luxury and Sustainable Comfort: Key Takeaways

  • Professional installation and calibration are vital for efficient, comfortable underfloor heating
  • Both electric and hydronic underfloor heating offer unique advantages depending on project needs
  • Plumbrite stands out as the expert choice for modern, efficient, luxury heating systems in the UK

Ready to Experience the Invisible Luxury?

Call Plumbrite today on 07933830316 or email: sales@plumbrite.org.uk to discuss your underfloor heating needs with a technical specialist.
Living Spaces

Write A Comment

*
*
Related Posts All Posts
01.09.2026

Credit Myths That Keep Minority Families from Buying a Home

But what if the truth was far more promising? Enter Phileshun Sylvan, a seasoned real estate advocate and trusted guide from Closing The Gap, whose mission is to replace fear with knowledge and empower families to unlock the doors to their new home, regardless of “perfect” credit Phileshun Sylvan on Why Perfect Credit Is Not a Homeownership Requirement "People have about the topic is that they have to have absolutely perfect credit, credit in the 7 hundreds, and that is absolutely not true." – Phileshun Sylvan, Closing The Gap According to Phileshun Sylvan, the stubborn belief that only those with “perfect” credit—typically scores in the 700s—can buy a home is perhaps the most damaging credit myth for minority families. Sylvan has witnessed, time and again, hopeful buyers sideline themselves before even speaking to a lender. The psychological weight of believing your financial past makes you ineligible can be crushing, especially when this notion has spread so widely that it’s become community lore. Sylvan’s direct approach, steeped in years of counseling first-time and minority homebuyers, cuts through this noise: “You do not need flawless credit. Many buyers are shocked to discover that homeownership is possible for them right now—with real flexibility from real lenders.” The lasting consequence? Entire generations missing out on wealth-building through property ownership Lower Credit Scores Can Still Open Doors: What First-Time Buyers Need to Know "Time homebuyers could actually get into their homes with a credit score as low as 580. [...] Many lenders will get them into their home with a credit score of a 580." – Phileshun Sylvan, Closing The Gap One of the most revelatory truths Sylvan brings to light is this: many first-time buyers are eligible for mortgages with credit scores as low as 580. This is not wishful thinking—Federal Housing Administration (FHA) loans, widely used by first-time and minority buyers, routinely approve applicants at this level. Sylvan explains that lenders nowadays look at far more than just a single number. If you have stable income and manageable debt, a 580 score is not a dealbreaker. In fact, falling for the “must have 700+” myth could cost families years of waiting, missing out on lower housing prices and housing security. For minority buyers in Louisiana and similar markets, understanding this benchmark is critical. Community conversations, often led by rumor rather than fact, too often discourage those who would otherwise qualify. Sylvan stresses, “The reality is, a vibrant housing market depends on inclusivity—and helping clients understand their options is the first step in closing the homeownership gap.” She urges her clients to meet with knowledgeable professionals sooner rather than later, so they can explore programs, interest rates, and tailored solutions while the market favors buyers. Why The Myth of Perfect Credit Persists Among Minority Communities "They just always have been told that you need perfect credit. [...] They just believe that to own something as large as a financial obligation of a house you need this great credit score. And that's just absolutely not true." – Phileshun Sylvan, Closing The Gap Why does this credit myth refuse to fade, especially within minority communities? Phileshun Sylvan identifies a powerful combination of generational misinformation and community storytelling Sylvan observes, “This myth persists not because of lack of opportunity but because of deep-seated fear—fear of rejection, fear of judgment, fear that our biggest dream is out of reach.” She challenges her clients to recognize that misinformation has cost their communities far more than a house. It has cost hope, stability, and the generational impact that homeownership brings. By demystifying the process and offering facts, Sylvan believes that families can reclaim their agency—breaking cycles of renting and instability that rarely serve long-term goals. The Real Impact of Credit Scores on Interest Rates and Lending Decisions While credit scores do influence loan terms, Phileshun Sylvan cautions buyers not to see them as the sole deciding factor. According to Sylvan, most lenders also weigh employment history, income stability, debt-to-income ratios, and the presence of savings or assets. Having less-than-stellar credit may result in a slightly higher interest rate, but the difference is rarely as dramatic as the myths suggest, especially for those using special programs. “Don’t self-reject based on rumors,” Sylvan advises. “Your score can shift over time, and there are lenders who specialize in working with buyers just like you.” According to widely reported data, FHA and VA loans—cornerstones for first-time and minority buyers—are specifically designed to be accessible for those with shorter or imperfect credit histories. With the right guidance, it’s possible to secure competitive rates, especially if buyers pursue targeted credit improvement steps and seek out grants or down payment assistance. Facing the process with transparency and accurate expectations transforms anxiety into actionable strategy. How credit scores influence home loan interest rates: Credit scores can affect the rate you're offered, but being below 700 does not mean automatic denial. Many lenders work with ranges starting at 580 for FHA loans, with manageable rate adjustments. What lenders really look at beyond credit scores: Lenders want to see stable income, job history, and responsible debt management. Sometimes they will work with applicants to resolve credit report errors or outdated negative items. Common down payment assistance and grant programs for minority buyers: Many state and local programs, as well as nonprofits, offer grants and low-interest loans to help with down payments and closing costs, especially for first-time buyers and underrepresented groups. Empowering Buyers: Education and Fast, Legal Ways to Improve Credit "Not to be afraid. Homeownership is achievable. Even without perfect credit." – Phileshun Sylvan, Closing The Gap "I would like to add for them to not be afraid because of a lack of education to become educated. On the process. Because the process is really more easier than they think." – Phileshun Sylvan, Closing The Gap Sylvan’s core message resonates powerfully here: Education is the antidote to fear. For first-time and minority buyers, the “unknowns” of the home buying process are often as intimidating as the credit myth itself. Sylvan advises: Start by getting educated. Attend local homebuyer education classes, read reliable resources, and connect directly with professionals like her, who specialize in walking new buyers step-by-step through the lending landscape. “The process is more accessible, and less intimidating, than you might think,” she reminds clients. When buyers feel prepared, the fear of credit rejection becomes manageable—and even motivating. Education is also the pathway to rapid, legitimate credit improvement. Sylvan discourages her clients from seeking risky or predatory credit “repair” schemes; instead, she provides actionable, legal steps for a better financial profile. Fast wins—like disputing errors, paying down small debts, and becoming an authorized user on a trusted account—can boost scores in just a few months. But above all, Sylvan’s approach is rooted in support and clarity. “Don’t let lack of education keep you from generational opportunity,” she counsels, urging every aspiring homeowner to take the first step—no matter how imperfect their credit may seem today. Practical Credit Improvement Strategies and Navigating Homeownership Programs Checking and understanding credit reports accurately: Regularly review your credit report for errors or outdated information—it's the first step toward meaningful improvement. Addressing negative items with lender counseling: Many lenders and credit counselors will help you dispute incorrect entries and create manageable payment plans to address legitimate debts. Utilizing down payment assistance programs: Explore local, state, and federal assistance designed for first-time and minority homebuyers—these can make a significant difference in upfront costs. Working with knowledgeable real estate professionals like Phileshun Sylvan: Partner with advocates who understand the unique barriers minority families face and can connect you to the right programs, strategies, and professionals. Summary: Closing The Gap on Credit Myths to Unlock Minority Homeownership Key Takeaway: Don’t Let Credit Myths Stop You from Owning a Home Perfect credit is not mandatory to buy a home Many lenders approve buyers with scores as low as 580 Education and support empower minority families to succeed Resources and assistance programs make homeownership accessible Next Step: Visit Closing The Gap for Guidance and Resources Homeownership isn’t just a dream for someone else—it’s possible for you, even if you don’t have perfect credit. According to Phileshun Sylvan, real possibilities begin when myths are replaced by facts, and when hesitation gives way to action. Her decades of advocacy have shown: when families get the right information and support, barriers fade—and homeownership is suddenly within reach. Ready to start your journey or need personalized guidance? Visit Closing The Gap today to explore programs, get your questions answered, and move past the myths that have held your family back for too long

12.15.2025

Don't Make This Costly Mistake in Home painting tips!

“Nearly 60% of DIY paint jobs require expensive touch-ups or complete re-dos due to avoidable mistakes.” If you think picking up a brush and a can of paint means guaranteed success, think again! Many homeowners unknowingly sabotage their own efforts and end up with streaky, peeling walls or costly repaints. In this eye-opening guide, we'll break down exactly what most people get wrong and how you can sidestep these pitfalls with expert-approved home painting tips. Stick around—you might just save yourself days of frustration and hundreds of dollars! A Shocking Truth About Home Painting Tips: What Most Homeowners Miss Most homeowners dive into painting projects believing a fresh coat will instantly transform a room. However, many overlook the crucial foundation beneath that shiny new color: proper prep, product choice, and technique. Even a high-quality paint can’t hide rough patches, poor adhesion, or streaks caused by ignoring simple, professional home painting tips. The truth is, those paint streaks you see or the peeling sections that appear months later are rarely the fault of the paint itself—they’re usually the result of overlooked steps and misunderstood instructions. From using the wrong roller cover on textured walls, skipping bonding primer, or neglecting a wet edge when rolling, the list of common mistakes is long—and expensive to fix. Whether you’re selecting a new paint color or prepping for a finish coat, understanding the right home painting tips means you can avoid costly re-dos and achieve beautiful results that truly last. Let’s uncover the practical tips and inside secrets that even experienced DIYers sometimes miss! “Nearly 60% of DIY paint jobs require expensive touch-ups or complete re-dos due to avoidable mistakes.” What You’ll Learn From These Home Painting Tips How to avoid the most common painting mistakes Techniques for achieving a professional finish with home painting tips Which tools and products to use for quality paint results Step-by-step guidance for proper application and preparation Expert advice on using a wet edge and understanding based paint options The Ultimate List: 10 Home Painting Tips to Prevent Expensive Mistakes 1. Never Neglect Surface Preparation in Home Painting Tips Why thorough cleaning and repair are vital in home painting tips Based paint adherence and the risks of skipping prep Surface preparation is the #1 secret behind every successful paint job. Experienced pros recognize that prep can actually take longer than painting itself. Before you dip a brush or roller in quality paint, be sure to meticulously clean, patch, and sand all surfaces. Use a mild soap or cleaner and a sponge or cotton ball to remove dust, oils, and old marks. This step is critical for both based paint and latex paint to adhere properly and avoid peeling. Skipping this stage leads to patchy, uneven coats and can cause paint from hard-to-reach spots to flake off within months. If you’re painting over wood trim or stained walls, use a bonding primer to maximize paint adhesion and eliminate the risk of peeling. Remember to remove or cover switches, fixtures, and lay down drop cloths to protect floors. Sand rough areas and fill holes using lightweight spackle; stubborn stains may require targeted cleaning or sealing. Well-prepped surfaces hold primer and finish coats better, giving your project a flawless, professional look that outlasts shortcuts. Investing extra time up front will dramatically reduce extra paint costs and frustration later! 2. Always Use Quality Paint for Long-Lasting Results How quality paint pays off over time Comparing price vs. performance in home painting tips While budget paints can look tempting, investing in a quality paint ensures long-lasting color, better texture, and fewer touch-ups. Higher quality paints generally provide better coverage and a more durable, higher sheen finish coat. They’re formulated with superior binders and pigments, meaning fewer coats per paint job and easier touch-ups in the future. The price tag may be higher, but the difference in performance outpaces the cost—especially on demanding surfaces like wood trim or high-traffic areas. When evaluating paint brands, look beyond marketing. Check online reviews on sites like Imageworks Painting, ask for sample brushes, and compare how paint color and finish resist scuffs, fading, or peeling. Quality paints spread evenly with less effort, adhere better after prep and priming, and ultimately save both time and money in future painting projects. Whether you choose latex or oil-based, don’t skimp; your finish coat will thank you for years. "Quality paint may cost more up front, but can save homeowners hundreds on frequent repaints." — Professional Painter 3. Keep A Wet Edge to Avoid Streaks and Marks Understanding the wet edge technique in home painting tips Common errors when maintaining a wet edge If you’ve ever seen visible lines or “lap marks” on a painted wall, chances are a wet edge was not maintained. The wet edge technique means that each stroke or roller pass overlaps the previous one before it dries. This allows the paint to blend seamlessly for a streak-free finish. Failing to follow this essential tip often results in the dreaded uneven sheen, especially when using a roller cover for walls and ceilings. To maintain a wet edge, work in manageable sections and never pause in the middle of a wall. When painting with a nap roller, avoid letting one area dry while you’re still working on an adjacent section. Re-load your brush or roller regularly and blend your strokes. This tip is crucial for both oil- and water-based paints, as each has unique drying times. Consistent attention to your wet edge delivers a finish coat worthy of a professional—and saves you from aggravating re-dos. 4. Choose the Right Based Paint for Each Room Differences between oil- and water-based paints When to use each type in home painting tips Not all rooms or surfaces are created equal, and neither are paints. Choosing between oil-based and water-based paint depends on the room’s function and the surface to be covered. For kitchens and bathrooms, where moisture and humidity are common, oil-based paints (also known as alkyd) deliver a higher sheen and superior durability. They're ideal for wood trim and surfaces exposed to regular wear. But for walls and ceilings, modern latex paint or acrylic-based paint is often the best option—offering easy cleanup, low odor, and quick drying. Always check labels for best use cases and drying times. For instance, water-based paints are better for living rooms and bedrooms, while oil-based is great for cabinetry. Don’t forget: using the wrong based paint can result in poor adhesion, bubbling, or chipping over time. Seek guidance from local paint pros or reliable resources like Imageworks Painting before making your selection, especially for high-traffic or specialty areas. 5. Invest in Quality Brushes and Rollers for Best Home Painting Tips How poor tools sabotage quality paint application Caring for your painting tools for longevity Your tools are just as important as your paint. A high-quality brush or nap roller cover will help you distribute the paint smoothly and evenly, minimizing streaks and roller marks. Cheaper tools tend to shed bristles or create an uneven finish coat, leading to a less professional paint job. Invest in an assortment of premium brushes (angled for edges, flat for large spaces) and roller covers suited for your wall texture—a longer nap roller holds more paint for rough surfaces, while a short nap is best for smooth walls. After use, wash brushes and rollers promptly with water for latex paint or the recommended solvent for oil-based paints. Storing them in airtight containers or wrapped in plastic between coats can prolong their life. Good maintenance not only saves you money on replacement tools but also ensures flawless results in every painting project. Remember, your choice of tools can make or break the beauty and longevity of your home’s painted surfaces! 6. Don’t Skip Priming: A Core Home Painting Tips Principle Why primer is essential for based paint and quality paint adhesion When and where to prime Priming is a crucial step often skipped by rushed DIYers. But primers play a major role in creating a strong bond between the surface and your topcoat, especially on patched walls, bare drywall, or wood trim. Using a bonding primer ensures paint adhesion and evens out surface porosity for a true paint color after the finish coat is applied. For hard-to-cover stains or color changes (especially with chalk paint), a primer will prevent bleed-through and discoloration. You should always prime after heavy patching, when painting over dark or glossy surfaces, or when switching between paint types (such as oil to latex). Don’t forget that skipping primer can cause your paint job to peel, streak, or require additional paint—ballooning your project’s time and budget. For a durable, professional look, priming is a step you can’t afford to miss! 7. Proper Tape Application: Clean Lines in Every Home Painting Project How to use painter’s tape for a perfect wet edge Tips for preventing paint bleeding There’s nothing more satisfying than a crisp, straight line between a wall and ceiling or along baseboards. This is where painter’s tape shines. Ensure you apply painter’s tape with firm pressure to prevent bleeding; a cotton ball run along the edge can help seal it further. Always remove the tape while the paint is still slightly wet to maintain clean lines and avoid lifting dried paint from hard surfaces. Choose blue or green painter’s tape rated for the length of your project; never use ordinary masking tape, which can tear or leave residue. Taping off wood trim, light switches, and windows is a pro strategy that distinguishes flawless paint jobs from amateur attempts. This attention to detail is what turns a basic DIY project into a showcase-worthy painting project that stands up to scrutiny. 8. Don’t Overload Your Brush or Roller Correct techniques for even distribution of quality paint Avoiding drips and roller marks in home painting tips Loading up your roller or brush with too much paint can lead to disastrous drips, sags, and roller marks. Instead, dip your tool about a third of the way into the paint; tap off excess against the tray or bucket. For roller covers, always roll off extra paint on the tray’s ridges to ensure even distribution. Overloading wastes quality paints and creates an uneven finish coat that’s prone to peeling and chipping. When using a nap roller, start in a “W” or “M” pattern to distribute the paint, then fill in the gaps using light, even strokes. If you see stubborn streaks or globs, stop and redistribute the paint with your brush or roller before continuing. This home painting tip is simple, but it makes a world of difference in achieving that smooth, professional wall or ceiling appearance. 9. Mind Your Drying Times When Following Home Painting Tips Why patience saves time and money Understanding manufacturer recommendations for based paint and finish types One of the most overlooked home painting tips is honoring proper drying times between coats. Impatience can ruin an otherwise flawless job: layers that are applied too quickly won't adhere, leading to bubbling, streaks, and possible paint removal during tape pulling. Always consult the paint manufacturer’s instructions for drying and curing times—these differ between water-based and oil-based paints, humidity levels, and finish coat types (including higher sheen or chalk paint). Allow ample ventilation using fans and open windows. This not only speeds up drying but also ensures a safer workspace and reduces lingering paint fumes. For the very best results, don’t rush to apply that next coat—even the highest quality paint or paint spray system can’t compensate for ignored drying times. Your patience now will reward you with a stronger, more beautiful finish for years to come. 10. Ventilation and Safety: Overlooked Home Painting Tips The impact of proper airflow on drying and indoor air quality Using PPE and handling based paint safely Never start a painting project without planning for ventilation and safety, especially when working with based paint that may release stronger fumes. Open windows and set up fans to promote airflow—this will not only speed drying but also protect your indoor air quality. Using personal protective equipment (PPE) like masks, gloves, and eyewear is crucial, especially when sanding, using a paint sprayer, or working in tight spaces. Strong solvents and fumes from oil-based or alkyd paints require extra caution and diligent use of PPE. Always store paint and supplies away from children and pets, and dispose of unused paint, cotton balls, and drop cloths responsibly. Safer working habits mean you can enjoy your beautiful, freshly painted room without health worries! Table: Comparison of Based Paint Types for Home Painting Tips Type Description Best Use Drying Time Durability Oil-Based Traditional alkyd resin; offers higher sheen and hard finish Trim, cabinets, kitchens, bathrooms, high-traffic areas 6–8 hours to touch; 24 hours to recoat Very high; withstands scrubbing and moisture Water-Based (Latex) Acrylic resins; low odor, quick drying, easy cleanup Walls, ceilings, general interior rooms 1–2 hours to touch; 4 hours to recoat Good; resists yellowing and mild scuffs Chalk Paint Ultra-matte, highly adhesive; easy to distress for vintage look Furniture, feature walls, crafts, upcycled projects 30–60 minutes to touch; requires sealing topcoat Moderate; needs wax/sealer for best wear People Also Ask: Common Questions About Home Painting Tips What is the 80/20 rule in painting? The 80/20 rule in painting means that 80% of your results stem from 20% of your efforts—primarily surface preparation. This classic principle highlights the importance of activities like taping, patching, and sanding. When you invest most of your time in prepping walls with a cotton ball, drop cloth, and bonding primer, you’ll find the actual painting goes smoothly, and the final result looks professional. Skimping on prep can double or triple your painting workload down the road! What is the correct way to paint a house? Start by thoroughly cleaning all surfaces and repairing any damage. Apply a suitable primer, choosing water-based for general walls or oil-based for trim or high-humidity areas. Use painter’s tape for crisp edges and protect floors with drop cloths. Paint from top to bottom—ceilings, then walls, then trim—with a quality nap roller or brush, always maintaining a wet edge. Allow sufficient drying times between coats, and ventilate well throughout the project. Finish by removing tape promptly and performing final touch-ups. How do I get a perfect line between my wall and ceiling? Achieving a flawless line between wall and ceiling requires patience and the right tools. First, use painter’s tape rated for delicate surfaces and press it down firmly with a cotton ball. Apply your ceiling color first and let it dry thoroughly. Then, tape off the ceiling just above the wall to be painted, overlap slightly, and paint the wall color. Remove the tape before the paint sets to avoid peeling, and use an angled brush for precision in tight corners or along wood trim. Can I just paint over existing paint? You can often paint over existing paint if the surface is in good condition—smooth, clean, and free of flaking or peeling. For glossy or oil-based surfaces, lightly sanding and priming with a bonding primer ensures better paint adhesion. When switching between paint types (like oil to latex), proper prep, cleaning with a cotton ball, and priming prevents compatibility problems and ensures your finish coat doesn’t peel or chip prematurely. Watch this step-by-step walkthrough covering every phase of a home painting project—surface prep, priming, taping, brushing, rolling, drying, and more. See how to avoid the most common mistakes and apply these expert home painting tips for a flawless finish! Expert Quotes on Home Painting Tips "Investing in surface prep and quality paint will always reward homeowners in beauty and longevity." — Painting Contractor Frequently Asked Questions on Home Painting Tips How many coats of based paint should I apply? What's the best type of quality paint for bathrooms? Can you mix different brands when using home painting tips? How many coats of based paint should I apply? Generally, two coats of paint are standard for most projects—this ensures true color and full coverage, especially after priming. For drastic color changes or challenging surfaces, an extra coat may be needed. What's the best type of quality paint for bathrooms? Choose a water-resistant, high-sheen latex or acrylic-based paint labeled for kitchens and baths. These formulas resist mold and are easier to clean, standing up well to humidity and frequent cleaning. Can you mix different brands when using home painting tips? While you should avoid mixing brands within the same coat, you can use different brands for primer, base, and top coats—just ensure they are compatible (oil with oil, water with water). When in doubt, stick to one manufacturer’s system for best results. Key Takeaways: Avoiding Expensive Home Painting Tips Mistakes Preparation and quality paint are the foundations of successful home painting tips Always select the right based paint for the surface Maintain a wet edge and follow manufacturer directions for best results See real-world home painting tips applied by pros and DIYers alike, with commentary on what to do—and what to avoid—for a picture-perfect paint job! Ready for a Flawless Paint Job? Visit us @ www.ocalapaintingpros.com/ for Expert Home Painting Tips Don’t let another paint project turn into a costly mistake. Trust the pros for guidance, products, and tips that truly make a difference. Visit our site, ask your questions, and let’s help you paint with confidence! Conclusion Apply these essential home painting tips for results you'll be proud to show off. Preparation, quality methods, and the right products are your best tools for avoiding expensive mistakes and ensuring beautiful, lasting walls.

12.15.2025

Why Professional Painters Transform Your Space Instantly

Shocking Fact: Did you know that the average professional painter can complete a flawless paint job in one day, while the typical homeowner may take up to a week—often with imperfect results? The impact of professional painters goes far beyond speed. If you’re seeking a breathtaking transformation and lasting beauty in your home, the evidence is overwhelmingly in favor of hiring the experts. This guide unveils the reasons behind these instant makeovers and gives you the insider’s path to a stunning, 2026-ready living space. The Immediate Impact of Professional Painters: Surprising Facts & Stats 80% of homeowners say their paint job by professional painters instantly refreshed their home's look—which can boost perceived value by 5-10% overnight. Painting contractors finish projects 60% faster than DIYers, with a far lower rate of costly mistakes or do-overs. Pro painters use specialized tools and techniques, resulting in a flawless coat of paint and superior durability that DIY attempts rarely achieve. Choosing a painting contractor often means less disruption, minimal paint fumes, and guaranteed satisfaction for both interior paint and exterior paint projects. What You'll Learn from Professional Painters Why hiring a painting contractor or professional painters delivers more than just a fresh coat of paint. The true cost to paint—from single rooms to entire homes, including commercial painting and stucco house projects. How to select top-rated painting services and avoid costly mistakes. The difference professional advice makes, including paint color trends for 2026 and choosing the right type of paint. Painting Contractor Vs. DIY: Why Professional Painters Are the Smart Choice Pro painters possess advanced skills, refined over thousands of painting projects, minimizing streaks, drips, and unevenness that are common in DIY jobs. Typical DIY mistakes include improper prep work, using the wrong type of paint, and neglecting surface repairs—leading to peeling, bubbling, and the need for an expensive redo. Painting contractors use precision taping, priming, and even application. Their methods ensure every inch of your walls, ceilings, and trim receive thorough, beautiful coverage. With a painting company’s guarantee, you’re covered in case of unforeseen paint issues, and you benefit from warranties rarely seen in DIY efforts. “A single professional painter can do in a day what might take homeowners a week—minus the mess and stress.” Painting Contractors’ Process: What Sets Pro Painters Apart Step-by-step precision: Pro painters inspect, patch, sand, and prime every surface before a single drop of paint is applied, ensuring longevity and flawless results on every painting project. Efficiency & tools: From dustless sanders to high-volume sprayers and premium roller covers, painting contractors use equipment that most homeowners simply don’t have. This means your space is refreshed quickly and cleanly. Star painting standards: Every detail is managed, from color consistency to crisp lines and clean transitions, ensuring your home is not just painted—but perfectly finished for show-stopping impact. Cost to Paint: How Much Do Professional Painters Charge? Project Type Average Cost Details Small Room (10x12 ft) $350 – $700 Includes two coats, standard prep Large Room (15x20 ft) $700 – $1,200 Extra prep, premium paint optional Interior (2,000 sq ft house) $2,500 – $7,500 Multiple colors, trim, ceilings Exterior House Painting $3,500 – $12,000 Depends on material (wood, stucco house), height, prep Commercial Painting $1.50 – $4.50/sq ft Varies by commercial paint type, size, and surface Factors affecting price include surface prep needs, number of coats, accessibility (e.g., high ceilings), and paint quality. Commercial and residential painting jobs can have varying costs—commercial painting often demands higher-grade products and more intensive preparation. Commercial paint and exterior paint choices influence final costs. A stucco house or historic home may require specialty products and skilled application, increasing the investment but protecting your property for years. Painting Services Offered by Professional Painters Interior paint: Walls, ceilings, trim, doors, cabinetry, accent features, and complete room transformations for a modern, beautiful home. Exterior paint: Siding, brick, stucco house exteriors, decks, fences, and more—guaranteeing lasting curb appeal and weather resistance. Specialty painting: Decorative finishes, mural art, faux textures, and restoration projects that demand expert attention. Commercial painting: Offices, retail, warehouses, and multi-unit properties with durable, code-compliant paints for business excellence. Stucco house and advanced finishes: Expertly applied exterior coatings for enhanced protection, modern color styles, and energy efficiency. Observe professional painters prep, paint, and reveal a stunning before-and-after—evidence of what hiring experts delivers in record time. Star Painting Results: How Pro Painters Elevate a Beautiful Home Professional painters deliver dramatic before-and-after reveals that showcase their painting contractor expertise. When you see a faded exterior or tired kitchen walls instantly refreshed, you'll truly appreciate the artistry and efficiency of pro painters. From increased curb appeal to higher listing values, a fresh coat by the right painting company pays off. Realtors report that new paint can be the deciding factor for potential buyers who fall in love at first sight. Clients regularly share stories of stress-free, mess-free painting projects—testimonials that reinforce why a star painting team is worth every penny. Choosing the Right Painting Contractor: Tips from Pro Painters Ask about licensing, insurance, and years of experience. Every reputable painting contractor will provide proof, and the best offer references and reviews to showcase past successes. Look for red flags—refusal to provide a written estimate, lack of detailed contracts, or absence of key certifications for professional painters. These are signals to continue your search. “Hiring professional painters is an investment in both tranquility and lasting beauty.” Types of Paint: Expert Recommendations by Professional Painters Commercial painting often demands high-durability, low-VOC paints that stand up to heavy use. Residential painting focuses on finishes that provide both beauty and protection—think stain-resistant enamels for kitchens and spa-like finishes for bathrooms. For a beautiful home in 2026, color trends are moving toward energized pastels (mint green, blush rose, sky blue) and modern neutrals (warm taupe, soft beige). Pro painters can recommend the type of paint that resists fading, staining, and wear for each area of your home or business. See how preparation, drop cloths, trim taping, and surface repairs ensure your painting project achieves lasting beauty and durability. Hiring a Painting Contractor: What Every Homeowner Should Know Checklist for screening: Confirm licensing, insurance, recent references, and familiarity with both residential and commercial painting projects. Get a detailed, itemized quote before agreeing to any work. Planning your project: Ask about prep timelines, expected completion dates, and paint brand recommendations. Top professional painters will manage your pro experience, from consultation to clean-up, with minimal disruption to your home. FAQ: Professional Painters & Painting Services How much does a professional painter cost per room? Most professional painters charge based on room size, surface preparation, and paint selection. A standard room is typically priced at $350-$700, with factors like wall repairs or specialty finishes increasing costs. Is it worth getting professional painters? Absolutely. Professional painters not only save you time and stress, but their craftsmanship consistently produces a lasting, high-quality result that adds curb appeal and real home value. How much does it cost to paint a 12x12 room? Expect to invest $400–$800 for a 12x12 room, depending on details like whether walls need repairs, number of coats needed, and the quality of the chosen paint. What is the average cost to paint the interior of a 2000 sq ft house? For a 2,000 square foot home, interior painting typically ranges from $2,500 to $7,500. Factors like custom colors, specialty ceilings, and the quality of paints can affect your final cost. Key Takeaways: Why Professional Painters Are the Foundation of a Beautiful Home Professional painters deliver superior results, speedy transformations, and long-lasting value to any home improvement project. Choosing the right painting contractor means enjoying a stunning, durable finish—without the risk and hassle of DIY mistakes. Special painting services, from commercial paint to stucco house transformations, are best left to expert hands who understand the critical role of using the correct type of paint every time. Ready for Transformation? Trust Local Professional Painters Today Visit our website: ocalapaintingpros.com Conclusion: For a home that truly shines in 2026 and beyond, the secret is simple—experience the difference only professional painters can bring.

Terms of Service

Privacy Policy

Core Modal Title

Sorry, no results found

You Might Find These Articles Interesting

T
Please Check Your Email
We Will Be Following Up Shortly
*
*
*